Five simple moves with your phone camera — these smartphone photography techniques I've tested on dozens of devices in 2026 can transform an ordinary shot into something worth framing. No expensive gear required. No complex settings.
You open the camera app, point, tap the shutter. 99% of the time, the result is... fine. Not bad, but nothing special. The gap between a typical photo and one that stops the Instagram scroll often hides in tiny details most people ignore.
I've spent months testing every new phone camera that hits the market — from the iPhone 17 Pro Max to the Galaxy S25 Ultra and Pixel 10 Pro XL. What I learned? The technology is there. The gap is in technique.
📖 Read more: 25 iPhone Tips & Tricks You Wish You Knew Sooner
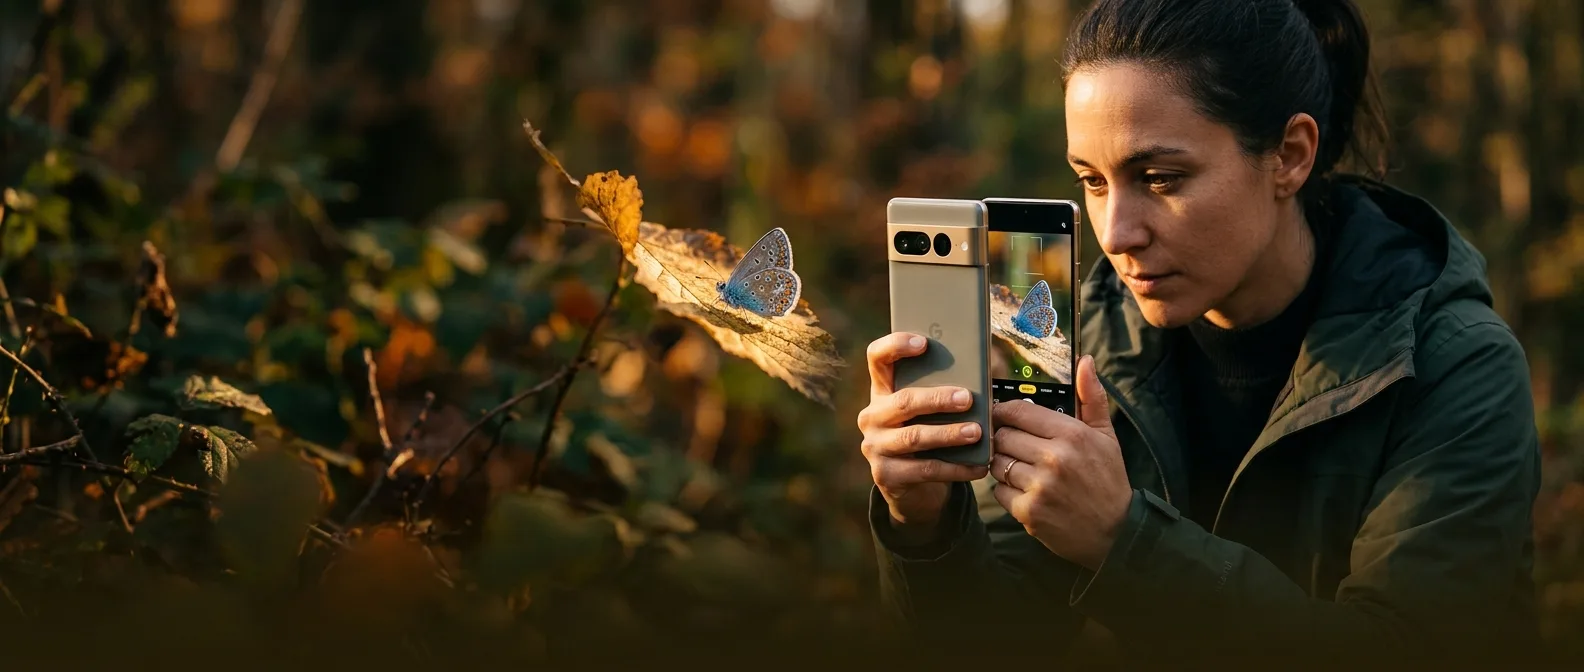
🎯 Macro Zoom: The Game-Changing Technique
Macro mode is everywhere now — every modern phone camera activates it automatically when you get close to your subject. But here's the trick most people miss: don't stop there.
After macro mode kicks in, try adding a little zoom. Yes, technically you're doing digital zoom, but the results are worth it.
The logic? You can get even closer without the camera lens literally breathing on your subject. This means better framing and fewer shadows from the device itself. I've tested this on flower petals, water droplets, even the details in my morning coffee.
Sure, it's not a magic bullet. Push the zoom too far and quality drops. But at 2x or 3x? The results are stunning.
📸 Telephoto Parallax: Hollywood Effect in Your Pocket
Everyone shoots with the main camera. Default choice. But here we're missing a huge opportunity — the telephoto lens can do something the main camera never can. The parallax effect.
5x Optical Zoom
On most 2026 flagship phones, 5x optical zoom is the sweet spot for this effect.
Urban Landscapes
Skyscrapers and cityscape shots create the most dramatic parallax.
What exactly happens? When you aim telephoto at a landscape, the different layers of the image — foreground, midground, background — get optically "compressed." The result looks like you've pulled the scene's depth closer to you.
I do this constantly with portraits. The background blur you get from telephoto is far more natural than the synthetic bokeh of portrait modes. And for landscapes? You fill the frame with more substance instead of empty sky or irrelevant elements at the edges.
When to Use It
Not for every situation. Telephoto parallax works best when you have layers in your scene — buildings at different distances, trees, hills, anything that creates depth. Flat landscapes? Probably not.
📖 Read more: File Explorer Hidden Shortcuts: 7 Tricks That Change Everything
🌙 Ultra Long Night Mode: The Hidden 30 Seconds
Night mode is standard now — every phone camera activates it when light drops. But those who dig a little deeper into settings might find something interesting: ultra long night modes that do exposures up to 30 seconds.
The iPhone 17 Pro has a "night mode max" that reaches 30 seconds. Samsung Galaxy phones hide similar features in Expert RAW mode. The difference in results is dramatic — stars that weren't visible at all suddenly fill the sky, architectural details lost in darkness emerge into light.
The challenge? You need absolute stillness for 30 seconds. Every tiny shake ruins the shot. But when you nail it, the results are astrophotography-level quality you wouldn't expect from a phone.
📖 Read more: Smart Home Uptime: 5 Tricks for 99% Reliability
🏗️ Vertical Panorama: The Inception Effect
Panoramas for landscapes, right? Wrong. Or rather, half-truth. What most people haven't considered is vertical panoramas — instead of left to right, you move from top to bottom.
"The results can be absolutely stunning — just watch your framing. Don't cover the entire span, or the image will distort."
Professional photographer, Tom's Guide
Buildings, trees, waterfalls — anything with height can become a striking vertical panorama. The trick is not going from the very top to the very bottom. That creates distortion that kills the aesthetic.
Instead, focus on a specific section you want to emphasize. I've tested this technique on Athens skyscrapers and the results have that "Inception-esque" look that makes buildings appear to bend upward.
Technical Details
Hold the phone upright and move slowly from top to bottom. The camera app will guide you, but smoothness is key. Every sudden movement will show in the final result.
🔄 Flip Your Phone: The Upside-Down Perspective
Last technique — and maybe the simplest. Instead of holding your phone the usual way, flip it upside down. The lenses that normally sit at the top of the device go to the bottom, closer to the ground or surface you're photographing.
The perspective change can transform an ordinary photo into something with more dramatic, abstract appeal. Works exceptionally well for cars, architecture, even food photography.
Why does it work? The low angle creates more dramatic lines and symmetries. Instead of shooting from your natural eye height, you capture the scene from an angle the brain isn't used to seeing.
I do this often with street photography. A road shot from a low angle creates leading lines that pull the eye deeper into the scene. Or with coffee on the table — the low angle makes the cup appear more monumental, more art-worthy.
📖 Read more: Windows 11 Annoying Features: 9 Tricks for Clean Desktop
⚙️ Bonus Tips: Settings That Make the Difference
Beyond the main techniques, there are some settings that change the game:
48MP Mode: If your phone supports it, turn it on. Yes, files are bigger, but the extra detail lets you crop without losing quality.
Grid Lines: The rule of thirds isn't a fad — it works because our eyes are used to these proportions. Enable the grid and place important elements where the lines intersect.
Photographic Styles vs Filters
The new photographic styles in modern phones (iPhone, Galaxy) are different from classic filters. Instead of "painting" the image, they intervene in the camera's behavior during capture. This means better quality and more editing options later.
Try reducing shadows in the styles — this creates richer blacks and better depth in the image, instead of the flat HDR look that makes all phones appear identical.
📖 Read more: 15 Ways to Double Your Phone Battery Life (Proven Tips)
📱 Editing: From Good to Professional
Photography is half the work. Editing is the other half. But you don't need to become a Photoshop guru to get professional results.
The native Photos app on most phones has tools sufficient for 90% of cases. Try the "undertones" slider — reducing it gives you more contrast. Left-right controls saturation.
Native Apps
iPhone Photos, Samsung Gallery — free and very powerful
Third-Party Options
Lightroom Mobile, Snapseed, VSCO for more control
For those wanting more control, Adobe Lightroom Mobile (free version) is a breakthrough. Auto tone often gives an excellent starting point, and from there you can fine-tune contrast, warmth, clarity.
The key to editing? Don't overdo it. The best edited photos don't look edited at all.
Big Mistakes I Avoid
Over-saturation is the #1 rookie mistake. Colors that "pop" from the screen usually look artificial. Better safe than sorry.
HDR processing that makes shadows look like midday even at night? Skip it. A little mystery in the shadows makes the image more interesting.
🤔 What's Coming Next?
Phone cameras are evolving at rates that would have seemed like science fiction until recently. In 2026's flagship models, we have computational photography that makes techniques possible that required studio setups just a few years ago.
But technology is just a tool. What makes a photo memorable isn't the megapixels or AI processor — it's the eye behind the camera. And that eye can be trained with practice and a few simple tricks that make the difference between snapshot and art.
Sources: